Feeds:
Posts
Comments

Archive for the ‘accessory’ Category

Do you love fabric? Do you wish you could get custom printed fabric (or gift wrap or wallpaper)?

Well that is just what Spoonflower is/does.

And right now they are having a wonderful event. 2nd chance at 2 for 1 Fat Quarters of Fabric.  Now until noon EST December 16. Effectively it’s actually 50% off Fat Quarters because when you get to your cart even if you have odd numbers they are all at 50% of regular price.

Usually they do this sale once a year — in November. This year I finally branched out from basic cotton and jersey and got some silk (real silk not polyester) and cotton sateen. They are gorgeous.

They have some truly lovely designs for sale. Just make sure to look at large pieces in the preview as not all designs repeat as well as others. Make sure you like the repeat before ordering.

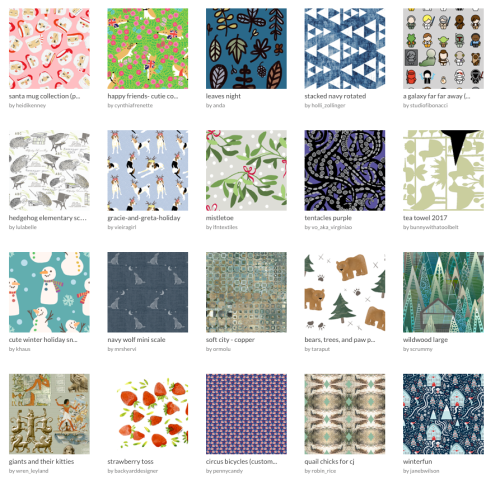
This are some the currently trending designs:

spoonflowers-whats-trending-12-14-16

And a few (OK more than a few) of the designs from my favorites:

spoonflower-a-few-favorites

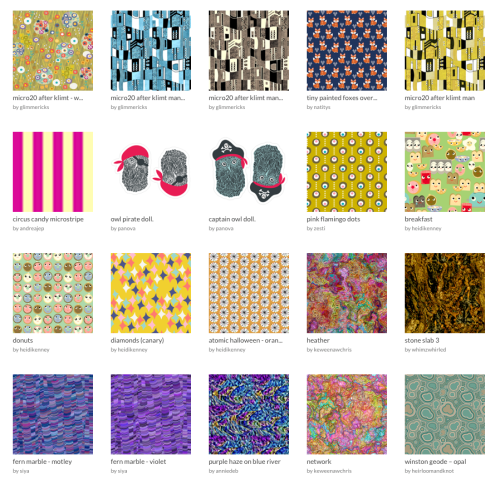
(I ordered a fat quarter of micro20 after klimt in silk and it is amazing – more pastel than the preview but amazing.) And the captain owl doll in linen canvas (8″ swatch is 1 doll).

spoonflower-a-few-more-favorites

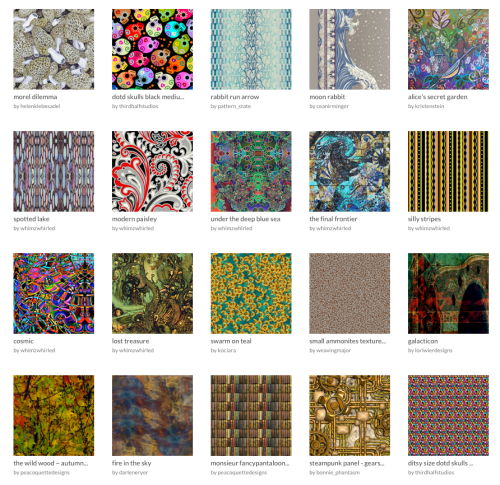
I ordered some dotd skulls black medium in linen canvas last year to make a new skull handbag. Still haven’t made it yet but I’ve got the fabric. Hah!

spoonflowers-the-favorites-continue

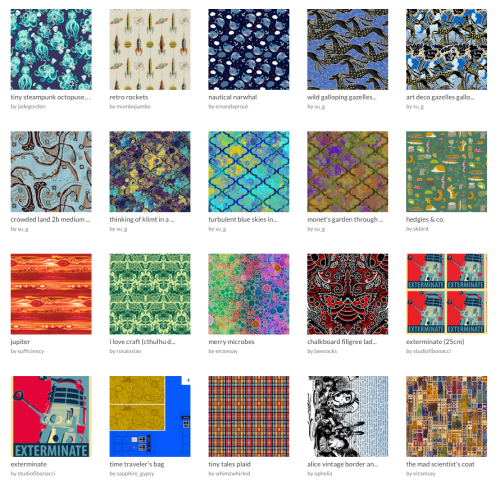
Yup, I bought the tiny steampunk octopuses and the exterminate 25cm fabrics this year.

I strongly advise creating an account so that you can make a favorites list; that way when there is a sales event so you’ve got them all in one easy to shop place. I didn’t do this the first year and figuring out what I wanted to order was both time-consuming and frustrating. Still worth it but boy did it eat up time.

Read Full Post »

For those of you who missed out on the Hermes Kelly bag printables (no longer available); take heart. Hermes has issued a new collection of printables.

Hermes clutch bag printables

Really adorable! Five fun designs and a blank for you to decorate yourself. I wanted to wait until I had printed out a few and played with them but a nasty headache has intervened.

So go here and download your own copies — now! Past history indicates that these won’t be available for very long so go download the files today even if you know you won’t be able to play with them for a while. Hint: click on “I want it” to get a window with the pdf file then save it to your computer; repeat for each bag design you like.

If you really want a Kelly bag; try this blog post. Coquette has kindly put a blank template with assembly instructions of the Kelly on her blog.

Read Full Post »

Man in the Moon Quilt

This is a small wall quilt that I made for John the year the movie about Andy K. came out. I thought it would be timely to blog about it now as there’s still plenty of time to whip up a similar quilt for the holidays if you were so inclined. It’s pretty basic; just a piece of patchwork, a dimensional face/moon, and a scattering of glass beads. The finished piece is a case of the final result being way nicer than it’s component parts.

man in the moon art quilt

The trick that I used to make the patchwork background is pretty easy. Use a rotary cutter and quilting ruler to cut a bunch of squares then arrange them on light-weight fusable interfacing (fusible surface up, squares wrong side down). Here’s something you should do that I didn’t: draw at least two perpendicular guidelines on the interfacing to help keep your work square. They even sell fusible now with a grid pre-printed on it (which they didn’t when I made this). When you get the arrangement the way you want it; fuse the squares in place. Ta-da! One piece ready to quick zip up all the seams. I incorporated a dowel pocket into the lining/backing to keep the quilt from sagging and sewed on a metal ring for hanging.

man in the moon quilt detail

Then there’s the moon/face that I made from a picture of Andy. I printed it the size I wanted on photo paper and mounted it with heavy duty iron-on glue to a piece of mat board. Then I trimmed it out with an exacto knife and sealed it with a couple of light coats of clear Krylon spray paint. I used hot melt glue (hi-temp) to attach three flat round shank buttons to the back which serve double duty to both attach the face to the quilt and also hold it out a bit from the fabric surface for more dimension. I painted the hardened glue and the back of the buttons with Scribbles fabric paint to make it look nicer and blend with the dark background. Then I used several strands of heavy button thread to tie the face on (marking on the back where each of the three buttons would fall so I’d know where to stab through). Make your strands longer than you need for tieing, stab them all through and then pull them all tight and tie off; really it’s much easier than trying to do each button in turn.

All in all, these are a couple of very versatile tricks that could be used and adapted to make a wide variety of wall quilts and other fabric objects. The picture on board trick is best used for objects that only get light handling — try iron-on transfer to fabric mounted on thick felt for stuffies and other medium to heavy use projects.

Read Full Post »

Inspiration

Every morning when I wake up, this is what I see:

yellow doll dresser

It’s a vintage dolls’ dresser that I’ve had for years. When I got it the mirror was missing from the swivel frame on the top and I never replaced it; it sat empty for a long, long time. Then my friend Elsa Mora blogged about a painting called Alert that she had done for an exhibit of her art. I knew right away where I needed to put a copy of that painting and with Elsa’s permission I printed it out and then the dresser finally was complete.

yellow doll dresser detail

This reminds me every day to stay awake, pay attention, appreciate what I have and let go what I have lost. There is great wisdom and no small amount of comfort in this piece.

Read Full Post »

Fabric Paper Dolls

These are about a foot tall and have a metal ring sewn to their backs so that they can hang on the wall. Their arms are jointed with little beads in a button-joint arrangement. I made them using a felt fused to fabric technique. Each doll has three layers: a surface/design fabric layer; a central stiffening sandwich layer of muslin fused on both sides of felt; and a backing layer of wool felt. The arms are made from two pieces of fused felt and design fabric which I hand sewed back to back. All design fabric layers are lined so that there are no raw edges. The dolls are embellished with both reverse and regular applique and a variety of beads.

Read Full Post »

Last August I realized several things. First, that NIADA at Arrowmont was fast approaching. Second, that I wasn’t going to want to be hiking back to my room for things I needed for my next activity. Third, that my current handbag was woefully inadequate for the task of holding what I was going to need for the whole day. Scratch that – I have Never owned a bag that really met my storing-my-stuff needs. So I decided to make my own.

It had to be sturdy; inside as well as outside. It had to have pockets on both the front and back and they had to be designed to hold the stuff I carry. There had to be open space in the middle for notebooks, datebooks, keys, the other detritus of daily life. The handles had to be strong and be attached in a way to allow hands free carrying. I wanted it to be cheerful and fun. Here’s what I made.

The fabric is an Alexander Henry paired with a light pink polka dot and a darker pink stripe, the binding is a black and white dash print. All the fabrics are quilting weight. The strap is nylon webbing designed for backpacks and other sporting gear; it’s attached with d-rings and is one continuous strand which allows for cross-body-bag-on-hip carrying. I generally double the straps and carry it over my shoulder but I like the versatility factor.

There is a simple secret to how I made the fabric so sturdy: I fused white acrylic felt to the wrong side of the fabric. In effect the entire bag is interlined with felt; lining and pockets too. It takes a very long time to do this with a home iron but it’s totally worth it for the final result.

Inside I put two arrangements of pockets. On one side I put two zipper pockets: one large, one medium, and a horizontal pencil/pen pocket. The medium pocket is for my cell phone and now I can always find it and a pencil – neither can burrow to the bottom of the bag any longer.

The other side I arranged to hold other things I didn’t want floating around; stuff I’d want to find quickly or wanted in a more protected space. So there’s a bank of open pockets for meds, chapstick, magnifier, and a business card pocket. Then there is a roomy cargo pocket for my camera or glasses case or a medium bottle of water. The cargo pocket has a flap that can be velcroed shut or tucked inside the pocket as needed.

As a bit of fun I planned the layout of the print for the front so that I could use a rhinestone-eyed skull as a decoration. I disassembled an old keychain and drilled a hole to make the skull into a button. It looks rather silly peeking out of the inside of the tote in this photo.

Read Full Post »